Today I will show you how to create a Photoshop design wedding ring logo icon in Photoshop.
[1] Take a new file of 550 pixels, 400 pixels, of resolution 72 dpi in the RGB mode.
[2] Create a new shape with the help of Elliptical Marquee Tool,
open a new layer fill the selection with #bbbdb2.
![]()
[3] Create the following selection with Elliptical Marquee Tool,
not hit the Delete key.
![]()
[4] Now create the following selection with Elliptical Marquee Tool,
go to Select>Modify>Feather Selection by 2px.
![]()
[5] Take the “Burn Tool” ![]() then create following
then create following
Shading with the help of Burn Tool.
![]()
[6] Take the “Dodge Tool” ![]() now press Ctrl+Shift+I,
now press Ctrl+Shift+I,
highlight the following parts, with the help of Dodge Tool.
![]()
[7] Now take the Brush Tool press F5 set the properties like this.
![]()
![]()
[8] Open a new layer. Set the Foreground color is black. Create a Stroke with the help of Pen Tool,
right click select Stroke Path now select Brush click ok.
![]()
![]()
![]()
[9] Duplicate that layer and place it like me.
![]()
[10] Now set the foreground color is white then Repeat Step 8,9.
![]()
[11] Then Select all Stroke Layers and then press Ctrl+E, to Merge down the layer,
then set the Opacity 17%.
![]()
![]()
[12] Create the following shape with the help of “Pen Tool” right click select
make selection open a new layer fill the selection with #cccec3.
Do not “D” select.
![]()
[13] Go to Select>Modify>Contract Selection by 1px.
![]()
[14] Take the “Burn Tool” ![]() press Ctrl+Shift +I, then create following
press Ctrl+Shift +I, then create following
Shading with the help of Burn Tool.
![]()
[15] Take the “Dodge Tool” ![]() highlight the following parts,
highlight the following parts,
with the help of Dodge Tool.
![]()
[16] Take the “Burn Tool” ![]() then create following
then create following
Shading with the help of Burn Tool.
![]()
[17] Create a new shape with the help of Pen Tool right click select
make selection open a new layer fill the selection with #999a94.
![]()
[18] Take the Burn Tool set the properties like me.
![]()
[19] Then create following Patch with the help of Burn Tool.
![]()
[20] Take the Dodge Tool apply the following settings.
![]()
[21] Highlight the following parts, with the help of Dodge Tool.
![]()
[22] Now Duplicate that layer a few times and place it like me.
![]()
[23] Create a new shape with the help of Elliptical Marquee Tool,
fill that layer with #d9d8c4.
![]()
[24] Take the “Dodge Tool” ![]() highlight the following parts,
highlight the following parts,
with the help of Dodge Tool.
![]()
[25] Create the following selection with the help of Pen Tool after that
go to Select>Modify>Feather Selection by 2px.
![]()
[26] Open a new layer fill the selection with #c3beab.
![]()
[27] Take the “Dodge Tool” select this brush then highlight the following parts,
with the help of Dodge Tool.
![]()
![]()
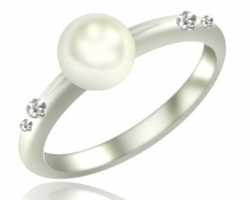
[28] Thanks for read this Photoshop Tutorial. I hope this is a good tutorial & you can use
these Photoshop Techniques & the Final Image should look like as shown below.
![]()
adobe photoshop cs tutorial
adobe photoshop cs2 text
adobe photoshop draw
3d candle stand tutorial in 3ds max
3d model wooden round table tutorials in 3d max
3dsmax 3d model construction spade studio tutorial in 3d max